No products
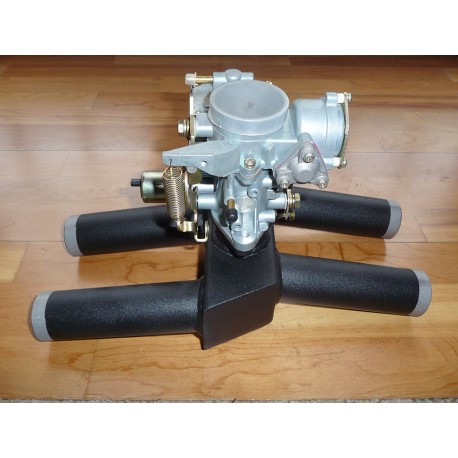
Honda Goldwing GL1000-1100 Single Manifold With Carburetor
GLD-INT-WCARB
New product
Single carb manifold with VW Type 1 carb for Honda Goldwing GL1000-1100
Designed to fit Honda Goldwing GL1000-1100 models
This product is no longer in stock
More info
Steel single carb manifold with VW Type 1 carb for Honda Goldwing GL1000-1100 is professionally designed and engineered by BiP Bike Intake Performance
All our products were designed, manufactured and shipped from our location outside Chicago, IL
Designed to fit Honda Goldwing GL1000-1100 models
Manifold is designed to convert a four carburetor configuration into one
Using this manifold avoids four carb maintenance, especially synchronization and improves fuel efficiency
Manifold is designed to use low maintenance VW Type 1 EMPI 34 PICT-3 carb which is included
***If you're needing the manifold without the carb or would prefer a Solex carb, please see our listings for these items***
Manifold and carburetor will ship separately. 99% of the time they arrive on different days
All parts from BiP Bike Intake Performance are carefully inspected prior to shipping and our positive feedback shows our commitment to our buyers and their loyalty to our products
Please email or call us at 224-210-6030 with any questions. We will respond within 1 working day.
Installation instructions with pics will be included with the part. Simple instructions listed below.
Materials
Steel
Crinkled powder coating finish
Parts included
Manifold
Carburetor
Gasket
Payment, Shipping and Returns
PayPal, Visa, Mastercard, Discover and American Express
We happily ship to US and Internationally
Product will ship within 5 business days and tracking number will be provided
No returns accepted for this product
Installation Guide
Goldwing Single Carburetor Conversion
Setup used only a single throttle control cable. Decelerate control and choke will not be used.
1. Remove intake boots, control cables, fuel lines etc.
2. Remove existing carb setup. Note: Remove carb assembly from left side of engine. Removal of right front air piston cap will aid in removal on some models
3. Install intake boots onto new manifold making sure rubber flanges are in good condition
4. Install new manifold with intake boots back on engine and reinstall flange bolts
5. Tighten boot clamps with 1” stainless 10-32 bolts (These are needed due to the larger diameter runners)
6. Install carb w/throttle control on the right side (Throttle cable bracket side)
7. Locate positive + electrical source (any live wire to the ignition will do and fuse box under top cover is the best location)
8. Connect 2 wires (positive + terminal) upper screw, right side of fuse box and verify
9. Connect 1 wire (negative – terminal) lower screw, right side of fuse box and verify
10. One positive + wire attaches to the electrical choke, the other positive + wire attaches to the air cut valve
11. Attach ground wire to carb body
12. Install fuel line, throttle cable and optional air filter
13. Turn ignition to ON position with engine in cutoff position
14. Crank engine a few times to allow fuel into carb
15. Recheck all connections (clamps, cables, fuel lines)
16. Start engine and idle for a few minutes
17. Decelerator cable should be removed to avoid cable jamming and choke cable can be zip tied inside tank cover
18. Get out of the garage and hit the road


